


ORTHOLUTION
Next Generation of Orthodontic mini-implant
-
Selection of the orthodontic mini-implant and determination of implantation dept
Selection of the orthodontic mini-implant and determination of implantation dept
Specifications & Selection of the implant
ORLUS implants(figure 3) are available in long type and regular type, depending on the length. The implants are also available in mini type, standard type, and wide type, depending on the diameter. An appropriate implant can be selected according to the conditions of the soft tissues and hard tissues of the location of placement.
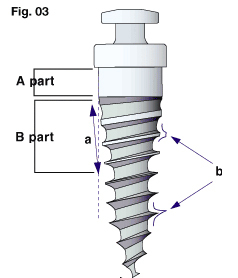
Fig. 3
Understanding of the design: the ORLUS mini-implant has a unique structure; it can be inserted to a greater depth, and more support can be obtained from cortical bone because it has a tapered core (a)that widens with height and a dual thread (b)which consists of trapezoidal threads in the cervical area and reverse buttress threads in the apical area.
The A part area without threads is designed for contact with the soft tissue while the B part area with trapezoidal threads is designed for contact with cortical bone to obtain primary stability. In every case, the B part area should remain in contact with cortical bone for stability. And for areas with thick soft tissue, the A part area of an implant should be of appropriate length for the thickness of the soft tissue.
By diameter The diameter should be determined according to the condition of the hard tissue (figure 4, 5).
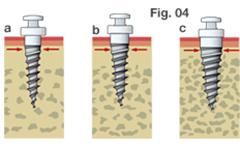
Fig. 4 There are three main types of implants in diameter. The diameter of an implant is chosen in terms of the mini type, regular type, and wide type according to the quality and quantity of cortical bone.
- Mini type (ORLUS 1O14107): The mini type implant is 1.4mm in diameter at the center, and 1.6 mm at the cervical area. It is used in places where abundant space is not available, such as at the anterior alveolus.
- Regular type (ORLUS 1O16106, 1O16107, 1O16108, 1O16208, 1O16309) : The regular type implant is 1.6mm in diameter at the center and 1.9 mm at the cervical area. This type is used in general areas where the bone quality is adequate.
- Wide type (ORLUS 1O18106, 1O18107, 1O18108, 1O18208, 1O18309): The wide type implant is 1.8mm at the center and 2.2mm at the cervical area. This type is used in general areas and is useful in areas of inadequate bone quality.

Fig. 5 A mini type is useful where the interdental space is narrow, such as at the lower anterior alveolus.
By length
A screw length of 5mm with pre-drilling and 6mm without pre-drilling is usually sufficient for the bone contact. The length of the screw used for bone support is 5-7mm and that of the soft tissue sealing is 1-4 mm at the cylindrical neck area (figure 6).
The length should be determined according to the condition of the soft tissue.

Fig. 6 There are two main types of implant differentiated by length for different soft tissue conditions.
- Regular type: The length of screw in the bone is 5-7mm, and that of the cylindrical neck is 1mm. For the cylindrical neck section at the soft tissue interface, a length of 1.0 mm is normally selected for the buccal area of the maxilla and mandible.
- Long type (ORLUS 1O16208, 1O16309, 1O18208, 1O18309) : The long type implant is designed for various soft tissue conditions at the location of placement. In long type implants, the length of the screw in the bone is 5-6mm depending on personal preference, while the cylindrical neck is 2-4mm long for the implant-soft tissue interface. Implants with 2mm of cylindrical neck are sometimes preferred for movable tissues; this prevents coverage by the epithelium. In the posterior palatal area and the retromolar area, the length of the cylindrical neck portion should be chosen by direct measurement using a periodontal probe, since the thicknesses of the soft tissues in the posterior palatal area and the retromolar area vary from 2mm to 6mm.
Determination of insertion depth
As the amount of implant exposure increases, the discomfort of the patient and stress from the oral environment also increases. This can lead to adverse effects on the healing process and maintenance of the implant. However, if the exposure level is too low, particularly in the oral mucosa area or areas in which the soft tissue moves a great deal, soft tissue covering, persistent inflammation, or the development of abscesses may occur. Therefore, exposure of the mini-implants should be adequate.
An adequate exposure level of the mini-implant is determined by the condition of the soft and hard tissues, and the surrounding environment within the oral cavity (figure 7)
In cases in which poor bone quality or insufficient primary stability is an issue, it is better to implant deeper even though soft tissue problems are likely to occur. When inserted deeper, the stress to the implant from the surroundings decreases and, hence, produces more favorable conditions for the healing process. Furthermore, when placed deeper, the tapered core of an implant increases the bone condensing effect, which then improves the quality of bone so as to increase primary stability.
When an implant is placed in the mucosa, adequate exposure is needed to ensure that the implant does not become covered. However, it should be kept in mind that the larger the exposure, the more negative the effect on the healing process, which in turn, could adversely affect the stability of the implant.
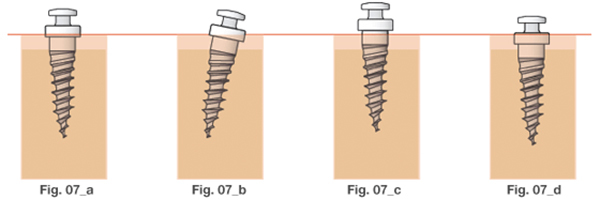
Fig. 7 The insertion depth of the implant is determined by the condition of the soft tissue, the condition of hard tissues and stress from the surroundings. To prevent soft tissue coverage, areas in which the soft tissue is very mobile (c) need sufficient exposure compared to general cases (a, b). However, in thick keratinized tissue, such as the palatal interdental area, minimum exposure is acceptable (d). Implants that use indirect anchorage or bonding of the attachment necessitates sufficient head exposure for resin work that needs fluid control(b).
Instruments
To minimize surgical trauma during implantation and to prevent root damage, a manual pre-drill system (OS DRL-H116, OS DRL-E161, OS DRL-E162) was developed (figure 8). The length of the ORLUS Surgical drill is limited; therefore, it can only bore into soft tissue and cortical bone. Instruments exist for direct implantation (figure 9) and for indirect implantation (figure 10).
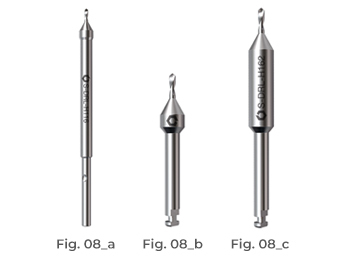
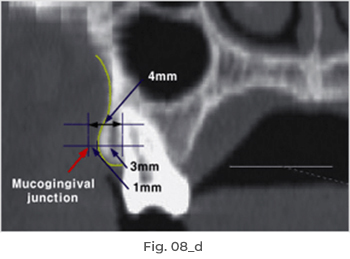
Fig.8 The Safe pre-drill system for safe implantation procedures. The Safe drill has been designed to perforate cortical bone efficiently and to prevent root injuries. The length of drill is 4mm long, so the drill is unable to reach root surfaces at the mucogingival junction.(d)
- Hand-driver type, which is used by insertion into a hand-driver. (OS DRL-H116)
- Dental latch type, which is used by insertion into a handpiece (for alveolar area) (OS DRL-E161)
- Dental latch type, which is used by insertion into a handpiece (for midpalatal area) (OS DRL-E162)
- The length of drill is 4mm logn, So the drill is unable to reach root surfaces at the mucogingival junction.
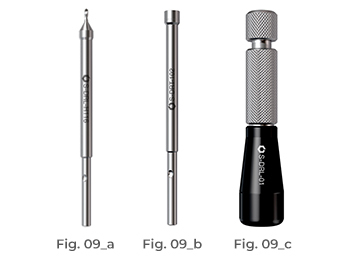
Fig. 9 Instruments for direct implant.
- The manual Safe drill (OS DRL-H116)
- Driver tip (OS-DRT-102)
- Driver handle (OS-DRH-01)
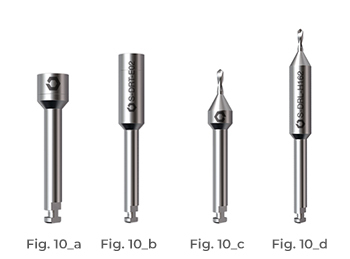
Fig. 10 Instruments for the indirect approach. This is a dental latch type, which is inserted into a handpiece.
- Standard driver tip (OS-DRT-E01)
- Long driver tip (OS-DRT-E02)
- The standard ORLUS Surgical drill (OS DRL-E161
- The long ORLUS Surgical drill (OS DRL-E162)

Fig. 11 There is a notch on the driver tip and a ball bearing on the handle. By pulling the end ring, you can put in the driver tip(a). After inserting the driver tip while pulling the end ring(b), take fingers off(c). Then, rotate the driver tip until you hear a click sound, or until the bearing ball of the handle fits into the notch on the driver tip (d). Make sure it has been properly placed by pulling the driver tip.
- 상호 : (주)오솔루션
- 대표자 : 김정문
- 주소 : 서울 강동구 양재대로 1371 (성내동) 207호
- TEL : 02-483-1212
- FAX : 02-478-0735
- 사업자 등록번호 : 212-81-63456
- EMAIL : orlus@ortholution.com
- Copyright(c) (주)오솔루션. All Rights Reserved.

